

Country Cake
The country cake is a dessert of humble origins, there are not many documents about it due to its peasant origin.
- Easy
- 1 h 20 min
- Kcal 577
If you're thinking about whipping up a country bread recipe from Northern Italy, this one's a real gem. In Lombardy—such a beautiful place—the art of baking pane di campagna is all about letting nature do its thing. No fancy gadgets, just simple movements and timing. Davide Longoni, the master baker, gets it. The mix of type 2 wheat and rye flour gives this homemade country bread a rich, earthy aroma and that classic crusty exterior everyone loves.
Using a natural sourdough starter? It's key. Adds a tangy note. Plus, with high hydration and careful folding, you get those big, beautiful holes—known as alveolatura. It’s amazing, really. Just a few careful steps, lots of patience, and you've got something with an intense, almost sweet smell fresh out of the oven.
Fans of a rustic bread recipe love that crispy crust and moist crumb. And listen, every bite has a hearty texture, with an inside that stays tender and chewy—perfect for dipping in olive oil or mopping up sauce. In Northern Italy, people enjoy this bread with local cheeses, salumi, or even just plain. Why? Because the flavor stands on its own.
It’s not something you rush—timing is everything. Letting the dough rest is key. Folks really really appreciate how this artisan bread recipe brings out the grain's taste, the natural sourdough, and that bit of toasty flavor from the crust. Trying a traditional country bread like this connects you with old-school baking. Feels like touching a piece of Italian food history.
The result? A golden, aromatic loaf making any meal feel more special. And you know what, it’s a bread that not only complements dishes but stands proudly on its own. It celebrates Northern Italy's deep-rooted baking traditions. Honestly, you gotta try it.
You might also like:
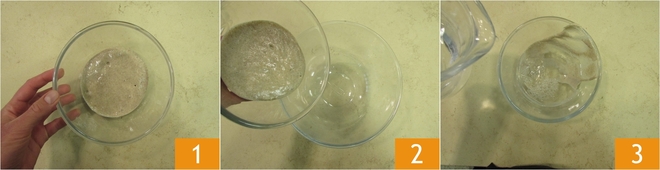
To prepare country bread, first refresh your sourdough starter. Wait 4 hours 1 and transfer it to a large bowl 2. Pour 325 ml (11 fl oz) of water into the bowl that contained the starter 3.

Stir to dissolve any residues 4 and pour everything into the large bowl with the sourdough 5. Mix with a spatula to soften the mixture 6.

Then add type 2 flour and rye flour 7. Always mix with the spatula, cleaning the edges of the bowl well from the flour, until you get a fairly homogeneous mixture, but not yet smooth 8. It is normal for the dough to tend to tear at this stage because the gluten network is not yet well formed. Always check the temperature of the dough, as the sourdough is very sensitive to temperatures. The dough should always have a temperature around 80-82°F 9.

Now let it rest for an hour. This step is called autolysis. After an hour, resume the dough 10, you will immediately notice that when pulling it, it will start to be more extensible. Add the salt to the dough 11 and pour 50 ml (1.7 fl oz) of water in several batches 12.
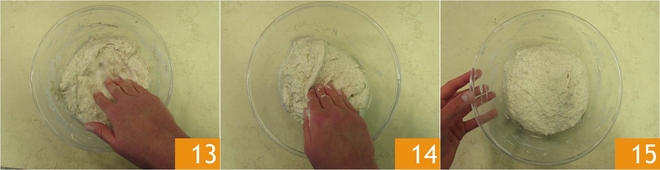
Press with your fingertips to dissolve the salt 13. Now gently lift one of the outer edges of the dough and bring it to the center 14. Rotate the bowl and continue this operation. In this way, the water will be absorbed, and the dough will not stick to your hands. Indeed, the hand should not be sunk but only placed. Keep pouring the water and repeat the operation, first pressing the dough, then bringing it to the center. As you can see, the dough now starts to take shape, give the dough some folds within the bowl, then set aside and let rest for 10 minutes 15.

Sprinkle a work surface with a thin layer of flour, add a little on the dough 16 and transfer it to the work surface 17. Give some slap and fold folds, lift the dough, and slightly slam it on the work surface, bringing a part forward and flipping it over 18.

Repeat this operation until the dough gains strength 19. Always help yourself with the dough scraper to collect the dough from the work surface 20. Finish the dough, then add a little flour on top and quickly give a couple more folds. Then proceed to the rounding. Position your hands in a cup shape, forming a v, rotate the dough giving it a spherical shape 21.

When the dough is nice and smooth 22, transfer it to a bowl 23, cover with a kitchen towel and let it rise for 3 hours at a temperature of 79-82°F. During these 3 hours, you will need to give the dough 4 sets of strengthening folds to make the dough even stronger and more extensible.

Thus, after the first half hour, detach it from the bowl 25, which should be very clean. Transfer it to a work surface and gently stretch it 26 to form a rectangle 27.

Bring the upper edge of the dough towards the center 28, then take the lower one and flip it over 29. Turn it 90° 30.

Do the same on the other side as well. Bring the lower edge of the dough towards the center 31, then take the upper one and flip it over 33. Flip it over, quickly shaping it into a sphere 33.

Transfer it back to the bowl 34 and cover with the cloth 35. These folds serve to give strength to the dough, which would otherwise be too relaxed, thus flat. Let it rest for 30 minutes, then transfer the dough to the surface and give another set of folds as just done 36.

Form a sphere again 37, transfer to the bowl 38, cover with a cloth 39, and let rest for 30 minutes. Repeat this operation 2 more times, always respecting the 30 minutes of rest between one fold and another, for a total of 4 folds.

After 3 hours, the dough will have doubled in volume 40. Sprinkle the work surface again, flip the bowl over, and guide the dough down with your hands 41. Divide the dough into two portions of about 500 g (1.1 lbs) each 42.
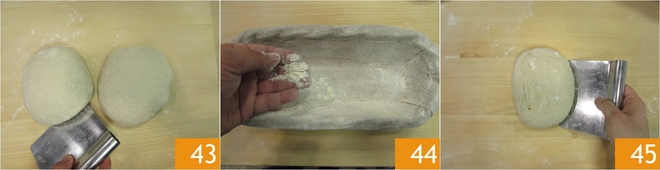
Without overworking the dough, shape two spheres with the dough scraper 43 and let them rest for 15 minutes. Now take two proofing baskets, about 10.5x4 inches (27x10 cm) or for 500 g of dough. If not available, place a cotton cloth inside. Generously sprinkle the inside of the baskets with flour 44, since the dough is very hydrated. Now shape your bread: sprinkle the work surface with flour, and transfer one of the portions onto it 45.

Flatten it slightly 46, then bring the upper edge towards the center 47 and then the lower one above to cover. Then also bring the left edge towards the center 48.

Lastly, lift the right edge and bring it to the center 49. Flip it over and rotate it on the work surface to create a loaf shape 50. Repeat the same operation for the second loaf, then using a dough scraper, lift one and transfer it into the proofing basket, flipping it upside down to have the smooth part underneath 51.

Do the same for the second loaf, then cover with a cloth 52. Let the dough mature for 30 minutes to two hours, depending on the temperature. In winter, more time will definitely be needed; we always recommend relying on your senses. To know if the dough is ready, make a slight pressure with your finger on the dough. If the imprint disappears quickly, it means it's ready; if it remains, you'll need to wait longer. Cover again and put in the refrigerator for 15 hours. Now dedicate yourself to baking. Turn on the oven about half an hour before heating it to a temperature of 446°F and place a baking stone in the center and a small bowl of water at the bottom to obtain the right humidity. After 30 minutes, the stone will be hot; remove it from the oven using the rack, without burning yourself, and place it on the work surface. Take the bread from the fridge 53 and flip it onto the stone 54. Do the same with the other.

Brush off excess flour 55 and with a blade make a longitudinal cut under the surface, tilting the blade at 45° 56. After making a deep incision on both loaves, quickly transfer to the hot oven. Bake for 30 minutes, then remove the bowl of water to form the crust and continue baking for another 15-20 minutes. If the color is too dark, lower the temperature in the last minutes. Remove from the oven and let the country bread cool 57 before slicing and enjoying it!