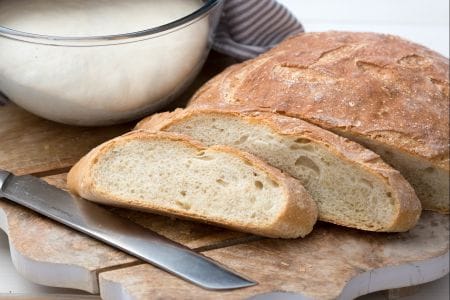
Sourdough Bread
Sourdough bread is made with a very simple dough based on all-purpose flour and semolina. The natural leavening will make it well-aerated.
- Easy
- 60 min
Bread with type 1 flour is a real staple in Italian kitchens, especially when you're craving that classic, rustic vibe. This flour kinda sits between regular white and wholemeal, giving your bread a golden hue and a slightly more moist crumb than your usual white bread. Seriously good. Using a sourdough starter—known as "lievito madre" in Italy—this Italian type 1 flour bread recipe offers a tender inside and a crispy crust that cracks just right.
And the magic? It's all in the long fermentation process, allowing the dough to rise slowly and develop those deep, nutty flavors. Baking with type 1 flour really lets you taste the grain. The smell? It fills your kitchen with that hearty, real bread scent that makes the proofing hours so so worth it. Across Italy, you’ll find variations—some using more wholemeal for extra chew or adding seeds for a crunch. And you know what? It's the type 1 flour that keeps it satisfying.
In Italy, bread-making is like a mini celebration, and this loaf shows why. When you slice into a fresh bread with type 1 flour, the crumb is open yet sturdy enough for dunking in soup or piling on cheese and cured meats. Compared to softer breads made with all-purpose flour, this rustic style has more character.
Plus, it stays moist for days without going stale. Folks often experiment with flour blends—type 0 for a lighter texture or more wholemeal for added fiber—pretty much allowing for personal touches in each bake. Beyond taste, type 1 flour bread benefits include a bit more nutrition and fiber due to the less refined grain.
It's perfect for the Italian tradition of transforming simple ingredients into something rich and fragrant, ideal for sharing at a family meal or enjoying with a drizzle of olive oil. Trying out type 1 flour in your own kitchen? It's a fun way to bring a slice of Italian bread history to life, with every loaf offering a unique experience each time you bake it. This approach to bread-making not only points out tradition but also encourages a bit of personal creativity in the kitchen. For real.
You might also like:

To prepare bread with type 1 flour, pour the flour 1, room temperature water 2, and refreshed sourdough from 1 day ago 3 into a bowl.

Work with your hands for about 10 minutes 4 until you get a soft and homogeneous dough 5. Cover with plastic wrap and let it rest for about 15 minutes 6.

At this point, remove the plastic wrap, add the salt 7, and work the dough by bringing the dough from the outside to the inside with smooth movements while also turning the bowl 8. Repeat this operation for about 5 minutes. Cover again with plastic wrap 9 and let it rest for about 30 minutes.

At this point, you need to do 3 rounds of folding, repeating the following operations three times: take an outer edge of the dough, lift it 10 and bring it towards the center 11. Rotate the bowl, take another edge of the dough and bring it towards the center 12. Rotate the bowl again, take another edge of the dough and bring it towards the center. For the last time, rotate the bowl again, take another edge of the dough, and bring it towards the center, for a total of 4 folds or overlaps. Cover with plastic wrap and let it rest for about 15 minutes. Repeat these operations as indicated two more times, with a time interval of 15 minutes between each. You will then have completed your 3 rounds of folding.

After the third round, cover with plastic wrap 13 and let it rest for about 4 hours at room temperature. Then transfer to the fridge and let it mature for 12 hours. Retrieve the dough, which will be slightly risen 14, transfer it onto a well-floured surface (always with type 1 flour). Gently spread the dough with your hands 15, lifting it from underneath.

You need to form a rectangle of about 8x6 inches 16. Give some folds: fold the top part inwards 17 and the bottom part over it 18.

Take the smaller “open” side and bring it inwards 19. Repeat the operation for the other side 20. Flip the bundle and quickly shape it into a sphere with your hands 21.

Line a bread form (or a bowl) with a dry and clean kitchen cloth and lightly flour it. Transfer the shaped dough with the seam facing up. Lightly flour with type 1 flour 22 and cover with the edges of the cloth. Let the dough rest for 2 hours at room temperature and transfer again to the fridge for 6 hours. At this point, preheat the oven to 482°F static, leaving a cast iron pot in the oven until it reaches temperature (alternatively, you can use the oven tray to bake the bread). When the oven is hot, take the dough 23 and flip it onto a sheet of parchment paper 34.

Lightly dust the surface of the bread again with type 1 flour 25, spread it very gently with your hands 26, and make an oblique cut from side to side 27.

Place inside the hot pot or tray without burning yourself 28 and bake in a static oven for about 30 minutes at 482°F and for another 5 minutes in a fan oven, still at 482°F. Once ready, remove the bread 29, transfer it to a wire rack 30, and let it cool completely before slicing (it might take an hour).