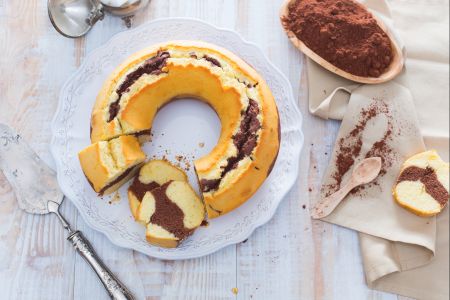
Two-tone tart
The braided two-tone tart is a spectacular and truly delicious dessert. Made with two types of shortcrust pastry and filled with two types of cream!
- Difficult
- 2 h 25 min
- Kcal 519
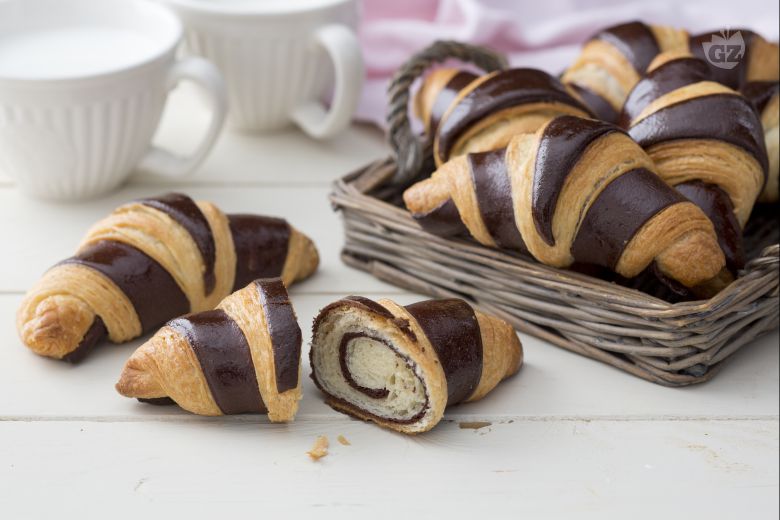
The bicolor croissant is here to shake things up at your breakfast table. Really good stuff. This creative twist on the classic French pastry brings together two different doughs, offering something truly special. First, you've got the traditional buttery croissant dough—flaky and golden, just as you'd expect. And then, there's the cocoa-flavored pan brioche, adding a touch of sweet richness. This two-tone croissant not only looks stunning but also delivers a tasty mix of textures and flavors in every bite.
Imagine the aroma wafting through your kitchen as they bake—seriously good—it's a perfect way to start the day. The beauty of this chocolate croissant recipe lies in its versatility. You can get really creative with fillings, adding a spoonful of jam, a dollop of cream, or some melty chocolate for that extra indulgence. And look, in France, croissants are a breakfast staple, and this bicolor version brings a fresh flair that's hard to resist. Pretty much perfect with morning coffee.
While some bakeries experiment with variations, like using sourdough for a tangier bite, the combination of moist cocoa brioche and flaky pastry layers in this recipe is way, way better than others. It's a perfect pairing with a cappuccino, bringing together the best of French tradition and modern creativity. Baking techniques can lead to exciting discoveries. And trying your hand at these homemade croissants is a fun way to explore new favorites.
This treat is family-friendly too, with its tender inside and colorful stripes making everyone eager to grab one. Whether you stick with the or opt for the cocoa twist, a bicolor croissant brings the best parts of French baking into your home. It makes breakfast or brunch a little more special and fun every time. So here's the thing: why not add this tasty pastry to your morning routine and enjoy a taste of France right at your table? Can't go wrong.
You might also like:

To prepare the two-tone croissants, first make the butter that you will subsequently use for laminating. In the bowl of a stand mixer, place the 250 g of softened butter, add the seeds of the vanilla pod 1, and work it with the flat beater 2. Transfer the butter onto a sheet of parchment paper 3.
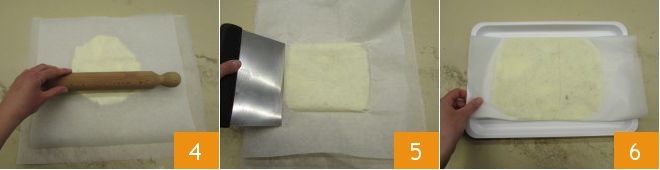
Cover with another sheet of parchment paper and roll it out using a rolling pin and a dough scraper 4 5. You should obtain a slab approximately ¼ inch thick, measuring 9x7 inches. Place the slab on a tray and refrigerate until needed.

Now, make the white dough. Dissolve the yeast in the room temperature milk 1 2. In the bowl of a stand mixer equipped with the hook attachment, pour in the two flours 3,

add the milk in which you dissolved the yeast 4 and the sugar 5. Turn on the stand mixer 6

then add the water 7. When the dough clings to the hook, start incorporating the softened butter one piece at a time 8, waiting for it to be completely absorbed before adding the next. Finally, add the salt 9

and continue to work for about 5 minutes until it becomes smooth and elastic 10. Then transfer the dough onto a work surface and shape it into a round ball 11. Once you have formed a ball, place it into a large bowl 12, cover with plastic wrap, and let it rise for an hour at room temperature. Then transfer the dough to the refrigerator and let it rest for 12 hours (maximum 15).

When the 12 hours are almost up, prepare the cocoa dough. In the bowl of a stand mixer equipped with the hook attachment, add the two flours and cocoa 1. Dissolve the yeast in the room temperature milk 2 3.

Pour the milk into the stand mixer 4 and add the sugar 5. Turn on the stand mixer and add the water 6.

When the dough clings to the hook, start incorporating the softened butter one piece at a time 7, waiting for it to be completely absorbed before adding the next. Finally, add the salt 8 and continue to work for about 5 minutes until it becomes smooth and elastic 9.

Then transfer the dough onto a work surface 10 and shape it into a round ball 11. Once you have formed a ball, place it into a large bowl 12, cover with plastic wrap, and let it rise at room temperature until needed: this will take about 3 hours.
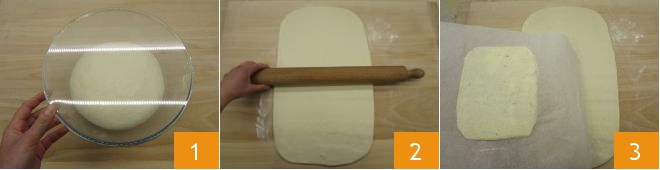
After the white dough has matured, take it out of the refrigerator and bring it back to room temperature 1. Roll it out to form a rectangle measuring 10x16 inches 2 and place the slab of butter in the center 3.

Bring the edges of the dough towards the center 4, making them meet but not overlap 5: this way, you will encase the butter slab. Rotate 90° and roll it out to a thickness of ¼ inch 6.
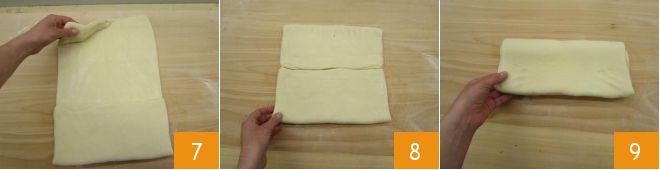
Now make the first 4-fold. Bring one of the two edges towards the center 7, then fold the other edge so that they meet 8. Close the dough like a book 9 and refrigerate for 30 minutes.
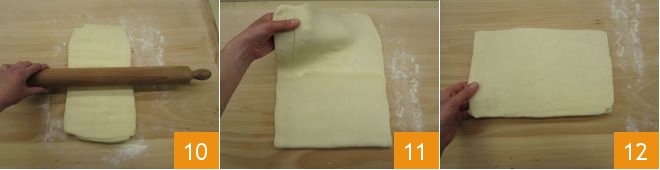
Roll it out again in the direction of the folds until you obtain a thickness of ¼ inch 10. Now make the first 3-fold: bring one end of the dough towards the center of the rectangle, pushing it slightly beyond 11, then fold the opposite part over it 12. Lifting the dough, you should see the 3 folds.

Transfer onto a tray lined with parchment paper 13 and let it chill in the refrigerator for 30 minutes. Then roll it out again 14, make the second 3-fold 15, and return to the refrigerator for 30 minutes. Retrieve the dough and make the third and final 3-fold in the same manner. Finally, refrigerate for 1 hour.

Take the puff pastry (white dough) and roll it out with a rolling pin to form a rectangle measuring 20x14 inches, about ¼ inch thick 1. Now take the cocoa dough, which should be well risen by now 2, and roll it out with the rolling pin 3

to form a rectangle measuring 20x14 inches, again about ¼ inch thick 4. Now brush the white rectangle with water 5 and place the cocoa rectangle on top, using the rolling pin to help 6.

Use your hands to align the edges well 7, then use the rolling pin to adhere the two layers completely 8. Cut your rectangle in half 9

and cut out 18 triangles with a base of 4 inches 10. Take the first triangle and, holding the base firmly, gently stretch the tip with your hand to lengthen it by about 1/4. Place it back on the surface and start rolling it, without pressing too hard 12

until you form the classic croissant shape, making sure to position the closure at the base 13. Continue in this way with all the others, placing them on a baking sheet lined with parchment paper and spacing them apart 14. Let them rise for an hour in a turned-off oven with just the light on, or in any case, away from drafts that would dry out the surface 15.

Bake in a preheated fan oven at 350°F for 25 minutes on the central rack. Monitor the color without opening the oven, and when they are golden brown, take them out 16. Meanwhile, in a saucepan, add water and sugar 17: bring to a boil until the sugar is completely dissolved 18.
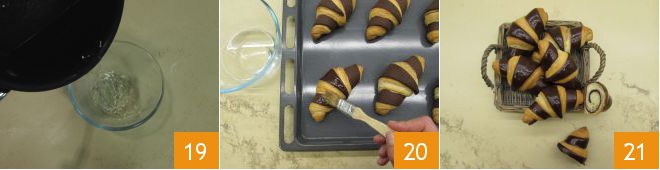
Transfer the syrup to a small bowl 19 and let it cool slightly, then use it to brush the hot croissants 20. The two-tone croissants are ready to be enjoyed 21!