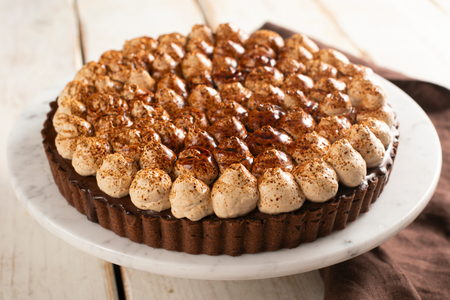


Gourmet tiramisu
The gourmet tiramisu is the special version of the most loved dessert by the Italians by Master Pastry Chef Iginio Massari, with homemade…
- Very difficult
- 3 h 10 min
- Kcal 979
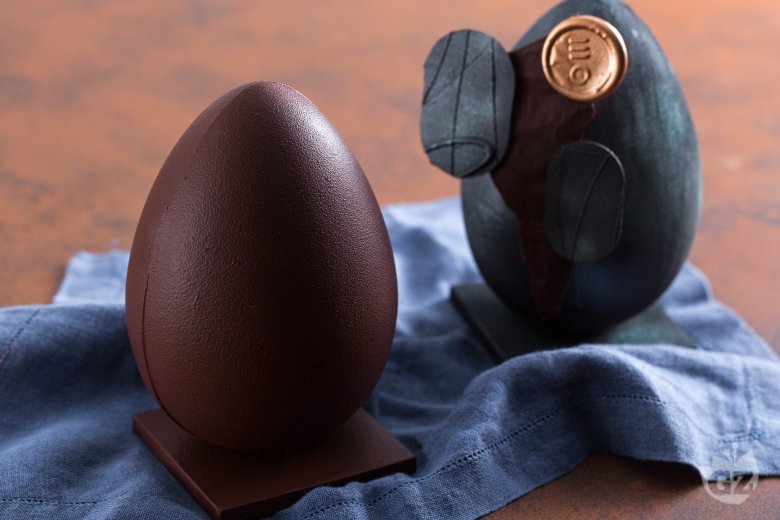
In Italy, the gourmet Easter egg is a big deal for the Pasqua celebration, turning what could be a simple dessert into something really special. These homemade gourmet Easter eggs aren't just about taste—though they're super tasty—they’re a feast for the eyes. Really, imagine oversized, shiny chocolate eggs wrapped in colorful foil. Perfect for a family egg hunt or as a centerpiece on the Easter table.
Getting that crisp, glossy shell? It involves using a thermometer to carefully temper the chocolate for that satisfying snap when you break into it. The molds—designed just for these eggs—let you get super creative. And you'll see everything from rich dark chocolate to creamy milk chocolate varieties. And sometimes, even a stunning bicolor effect. And listen, in some regions, they add roasted hazelnuts or fill the eggs with candies and surprises—making each one unique.
Easter eggs in Italy? More than just a sweet treat—they are art pieces. Often exchanged as gifts among friends, family and even coworkers. Some families go all out on a gourmet Easter egg recipe with luxurious fillings like creamy spreads or crunchy nuts. Really, turning a simple egg into a showstopper. Breaking open a golden, shiny egg to discover a sweet treasure is part of the joy. Many folks try making a luxury Easter egg at home, inspired by those amazing artisan chocolate shops in cities like Turin or Milan.
Whether large or small, each egg is rich and moist, varying in flavor depending on the chocolate and hidden surprises. Some even use the egg as a base for other desserts, filling it with creative creations. I mean, in Italy, a gourmet chocolate Easter egg is a must-have. Makes every celebration feel more festive and joyful. This tradition beautifully combines taste and artistry, capturing the essence of Italian Easter festivities. Seriously good.
You might also like:

To prepare the gourmet Easter egg, the first thing you will need to do is temper the chocolate. Equip yourself with a thermometer and proceed to melt the chocolate. You can choose whether to do it in the microwave or with the bain-marie method we show you. Place a pot of water on the stove and place a bowl over it 1. The water should not boil too much, otherwise, as it evaporates, it can fall into the chocolate. Then pour the chocolate chips, or coarsely chopped chocolate, inside 2 and stir until melted 3.

Using a thermometer, check that it has reached a temperature between 122°F and 131°F 4. At this point, carefully dry the bottom of the bowl and transfer the chocolate onto a clean and perfectly dry marble surface 5. With the help of 2 spatulas, spread the chocolate on the marble 6, spreading it and gathering it back to the center to cool the cocoa butter.

You will notice that gradually the chocolate will become shiny and thicker. Occasionally measure the temperature 7 and as soon as it reaches 84°F, transfer it into a bowl using the two spatulas 8. Stir the chocolate and heat it again in the microwave or bain-marie, until it reaches a temperature of 88°F 9. The chocolate is now tempered.

Transfer the tempered chocolate into the 2 Easter egg molds, which you will have cleaned carefully, filling the first 10 and second cavity 11 up to 2/3 of the edge of the mold. Gently jiggle the mold to cover every part 12 and wait about 45 seconds.

Now turn the mold upside down to allow the excess chocolate to escape 13: you can collect it on a tray and reuse it. Then leave the mold upside down on a rack for a few more seconds to let the excess chocolate drip off 14. Now embellish the inside of the egg by adding candied orange cubes 15.
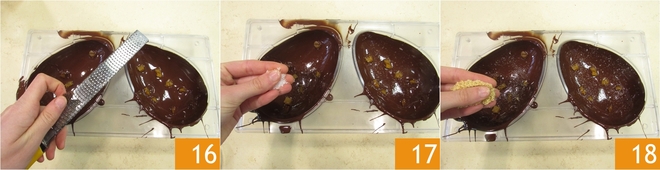
Add a grating of tonka bean 16 and a pinch of sweet Cervia salt 17. Finish with caramelized hazelnut flour 18.

Trim the edges with a spatula 19. Turn the mold, always placing it on the rack 20, and transfer it to the fridge for 5-10 minutes. Then let it crystallize at room temperature. When the mold appears completely matte, it means the chocolate is well crystallized 21.

Simply lift it gently 22 to extract the two halves 23. Heat a tray in the oven to 176°F. Take one of the halves and briefly place it on the tray to decrystallize part of the shell 34.

In this way, you can join it to the second shell 25, so the melted chocolate on the edges will cool and keep them attached. Place it inside a bowl and wait for it to solidify well 26 before proceeding. For an original decoration, you can take a sponge and grate the surface of the egg to stripe it 27.

Perform this operation decisively but gently 28. Now decrystallize the base of the egg on the tray, as done before, and place it on a chocolate block, so it will stand upright 29. The gourmet Easter egg is ready, if you prefer you can decorate it with food coloring and chocolate inserts 30.