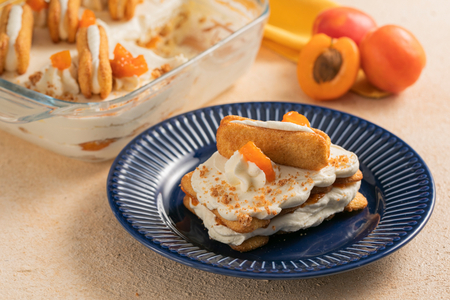
Egg-free Apricot Tiramisu with Pavesini
Fresh apricot tiramisu with Pavesini made without eggs. A creamy, quick spoon dessert perfect for summer, with no raw eggs in the cream.
- Easy
- 30 min
Gluten-free tiramisu is just one of those desserts that somehow keeps all the Italian charm while being accessible to everyone. You know, this classic treat comes from Veneto, and it stays true to its roots with homemade gluten-free ladyfingers. Pretty simple, right? These give it that light, tender texture fans of tiramisu just adore. The mascarpone cream? It's key. It offers a smooth and creamy consistency, so you're not missing out on any of the dessert’s appeal. Really, it’s super super good.
Here's the thing, this recipe embraces a straightforward, step-by-step approach—making it stress-free for anyone seeking gluten-free dessert recipes. Imagine sitting at a little café in Veneto—savoring a dessert that everyone at the table can enjoy. And the best part? With this gluten-free tiramisu, families and friends who need to avoid gluten can indulge in those sweet, coffee-infused flavors without sacrificing those lovely layers.
Some folks like to add their own twist—like a dash of Marsala wine or a sprinkle of local cocoa. I mean, the heart of this dish stays the same. A balance of creamy mascarpone and just a hint of tangy coffee. It’s, for real, a part of Italian cuisine that's welcomed these adaptations, leading to a variety of gluten-free Italian desserts and gluten-free no-bake desserts. Really really good stuff.
Whether you’re celebrating a birthday, enjoying a Sunday lunch, or simply craving a sweet treat, this gluten-free tiramisu is easy and packed with authentic Italian flavor. No one has to feel left out. Which is great.
You might also like:
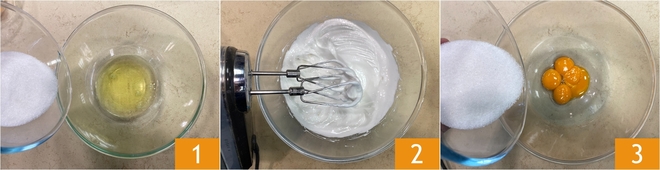
To prepare the gluten-free tiramisu, start with the gluten-free ladyfingers: first, separate the egg yolks from the whites. Pour the egg whites into a bowl, add 1.4 oz of sugar 1, and beat them to stiff peaks with an electric mixer 2. In a separate bowl, pour the egg yolks and the remaining 1.2 oz of sugar 3.
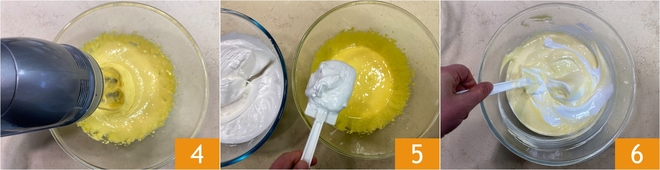
Beat with the electric mixer until you obtain a light and frothy mixture 4. Gradually fold the stiff egg whites into the yolk mixture with a spatula 5, gently mixing from bottom to top so as not to deflate them 6.
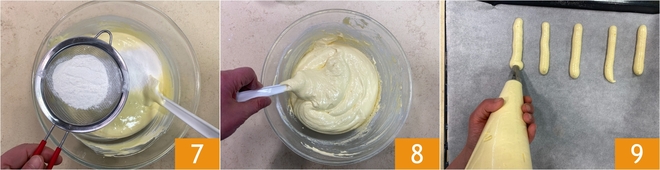
Now sift the dry ingredients into the bowl little by little: rice flour, potato starch 7, corn starch, baking powder, and xanthan gum. Mix gently again from bottom to top until a homogeneous mixture is obtained 8. Transfer the dough to a piping bag with a plain round nozzle of about 0.5 inches in diameter and form sticks about 4-5 inches long on a greased and parchment-lined baking sheet 9.
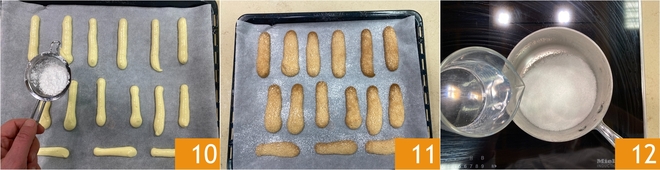
Dust the ladyfingers with granulated sugar and powdered sugar 10, then bake in a preheated static oven at 356°F for about 15 minutes. Remove from oven and let cool 11. Meanwhile, prepare the cream: in a saucepan, pour the sugar and water 12.
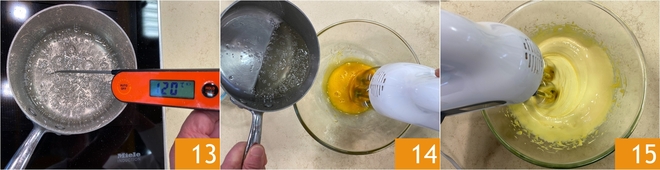
Bring the mixture to 250°F, measuring the temperature with a kitchen thermometer 13; if you do not have a thermometer, the syrup is ready when small white bubbles form on the surface. Just before reaching 250°F (around 239°F), start beating the yolks with an electric mixer. Once 250°F is reached, pour it over the yolks in a thin stream, keeping the mixer running at low speed 14. Continue beating until completely cooled 15.
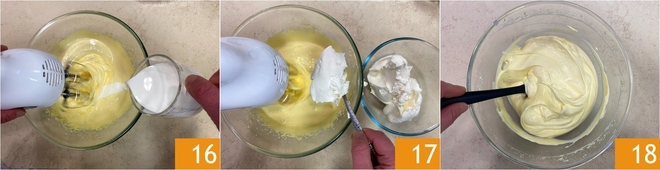
Now fold in the fresh cream 16 and the mascarpone, one spoonful at a time 17. The cream is ready when all the ingredients are well combined 18.
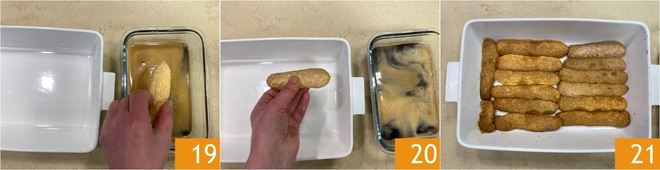
Brew the coffee with a moka pot and let it cool. Now you can assemble your tiramisu: take a dish, dip the ladyfingers in the coffee 19 and place them on the bottom 20 to create the first layer 21.
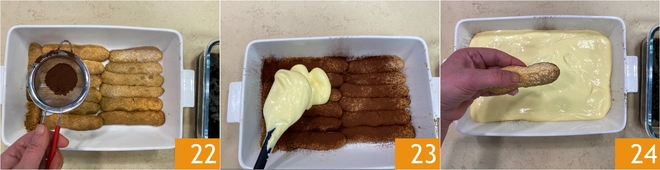
Dust with a layer of unsweetened cocoa powder 22, then spread half of the cream 23. Now create the second layer: place the ladyfingers soaked in coffee 34.
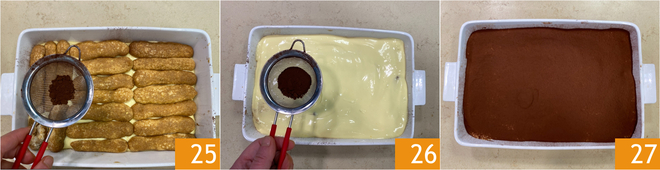
Dust with cocoa 25 and spread the remaining cream evenly. Finish by covering with plenty of cocoa 26. Let your gluten-free tiramisu set in the refrigerator for at least an hour before serving 27!