
Chocolate slices with almond aroma
The chocolate slices with almond aroma are soft delights that you can prepare and serve accompanied by a good tea or coffee.
- Easy
- 40 min
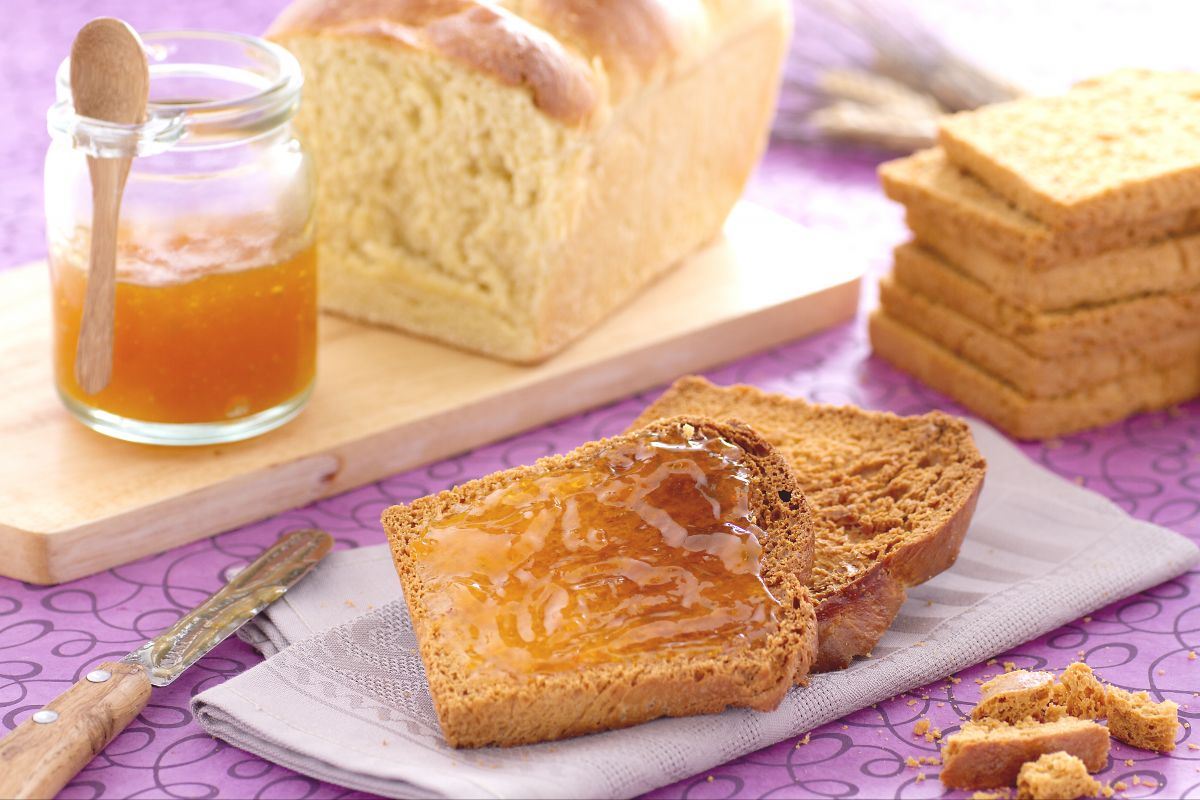
Fette biscottate is, honestly, your go-to Italian breakfast toast. It's that golden, crispy slice you'll find in every Italian kitchen. Starts off as a soft pan brioche loaf. Baked once, then sliced and toasted again. That’s how you get the perfect crunch. And look, the fette biscottate recipe is a big tradition. Some folks? They use oil instead of butter, or add honey for a bit of sweet flair. Really depends on what's around. You end up with slices that are just right for dunking or slathering with your favorite toppings.
What’s really really awesome is that homemade Italian rusks taste super fresh. And they keep that crunchy bite for days—especially if stored in a tin box. These gems pop up at breakfast tables everywhere, usually with homemade jam or marmalade. It's the sweet aroma that just makes mornings better.
People in different regions? They add their own twist. Some might go heavier on honey for a stronger sweet kick. Others bake a bit longer for a super golden finish. Making homemade fette biscottate is pretty rewarding. You get that fresh-from-the-oven smell, which is so so satisfying, and a crispy texture that beats anything store-bought. And listen, these slices are more versatile than you’d think. Sure, you can go with jam or butter. Pretty much the usual. But some folks love them with savory toppings or even alongside soup.
The double-baking is what sets this Italian toast recipe apart—it makes the bread tender inside and crisp outside. Perfect for soaking up flavors without falling apart. Breakfast just feels special when there’s a plate of Italian breakfast rusks going around. Making them at home? It’s a fun project that pays off all week long. If you love simple, crispy things with a touch of old-school charm, fette biscottate might become your new breakfast staple. Plus, experimenting with flavors keeps the tradition alive and—honestly—super delicious.
You might also like:

To prepare the toasted bread slices, take the bowl of a stand mixer fitted with the paddle, sift the flours 1, dissolve the yeast in warm water (alternatively you can use 15 g of fresh yeast) 2 and add it to the flours 3; if you don't have a stand mixer, you can knead by hand, initially using a fork to mix the flours with the liquids).
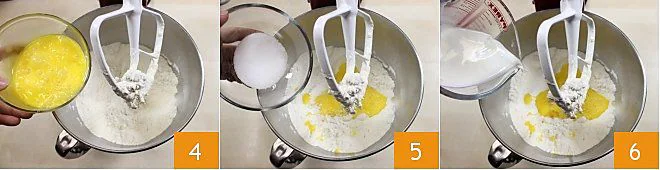
Add the beaten eggs 4, the sugar 5, and the warmed milk 6. Knead well for about 15 minutes until you get a homogeneous mixture. If necessary, stop and turn the dough over several times.

At this point, replace the paddle with the hook 7 and add the salt and soft butter, one cube at a time 8, waiting for the first one to be absorbed before adding the next one. When the dough is smooth and elastic (it will take about 20 minutes) 9

form a ball 10, place it in a bowl covered with plastic wrap for 30 minutes in the oven turned off (the temperature should be about 77°F-79°F). After this time, line a loaf pan measuring 11x4.3 in (h 2.8 in) with parchment paper 11, lightly butter the pan and cut a rectangle of 11x4.3 in to cover the bottom of the pan, and a strip 2.8 in high and 30.7 in long for the walls, making sure the parchment paper adheres well to the pan to avoid wrinkles. Take the dough again, flatten it with your hands and roll it onto itself. Place it in the pan 12 and let it rise in the turned-off oven with the light on
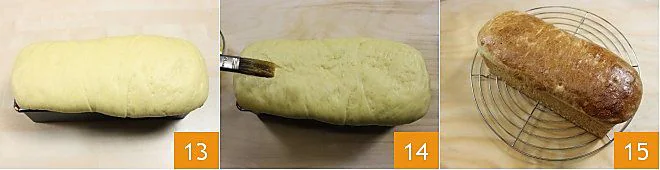
until the dough reaches the edge of the pan 13 (it will take about 50 minutes). Finally, brush the dough with beaten egg 14 and bake in a preheated oven at 356°F for 40 minutes. Let it cool slightly, remove from the pan, and let it cool on a wire rack 15.
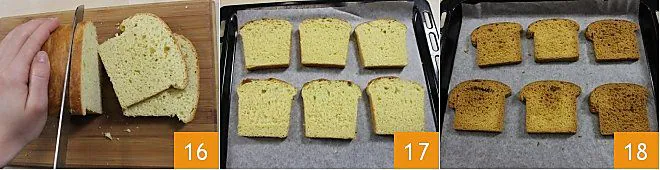
Once cool, cut slices 16 about 1/4 inch (or 1/2 inch, depending on taste), place them on a baking tray covered with parchment paper 17 and bake in a preheated static oven at 302°F for about 1 hour, or in a fan oven at 266°F for 45 minutes or until they are dried and have reached a brown color 18. Remove from the oven, let them cool on a wire rack. Your toasted bread slices are ready to be enjoyed with your preferred jams!