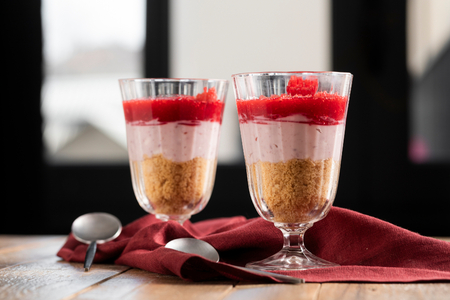
Ricotta and Raspberry Glasses
Ricotta and raspberry glasses are a gluten-free layered dessert, with a cheesecake-like base, a fresh cream, and a delicious fruit coulis!
- Easy
- 25 min
When summer finally rolls around and fresh fruits are everywhere, this raspberry jam recipe is something you just gotta try. And you know, it really captures that sweet, sunny flavor for later. And listen, in Italy, they totally love making homemade preserves. It's all about using ripe raspberries because, honestly, the better the fruit, the better the jam. Simple as that.
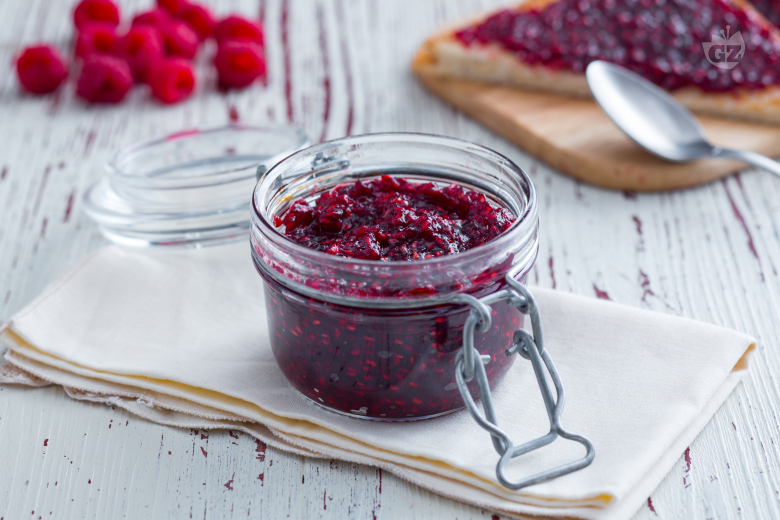
The result? A jar of homemade raspberry jam that's got this perfect balance of tangy and sweet. Super super tasty. It's perfect for spreading on toast, swirling into yogurt, or filling tender pastries like sbriciolata alla marmellata. One handy tip—remove most of the seeds for a smooth texture. And perfect for those who prefer it seedless. Seasonal fruits steal the show here, so mix it up with strawberries or cherries in summer, or go for oranges and spiced apples when it’s colder. Cannot go wrong.
Ever find yourself with more fruit than you can eat? Making an easy raspberry jam is a fantastic way to save those flavors. Seriously good. It's kinda satisfying to have a shelf full of homemade jams, each with its own little twist, depending on what’s in season. Italian families might exchange tips on getting raspberry jam to set just right or achieving that rich, moist texture without store-bought pectin. And knowing what’s in your food? Comforting, for real. This raspberry jam recipe usually sticks to just fruit and sugar, but you can try a batch of raspberry jam without pectin or even a sugar-free version.
Some folks swear the jam tastes even better after a couple of weeks when the flavors have really really blended. Whether it's for breakfast, snacks, or desserts, this jam brings a taste of summer to your table. And look, it's pretty cool to know you made it yourself. It's always a hit when family and friends come by. So, grab a spoon and enjoy—it’s golden, fragrant, and a great treat any time of the year.
You might also like:

To prepare the raspberry jam, make sure you have sanitized the jars you will be using, following the instructions at the end of the recipe. Wash the raspberries well under running water. Then let them drain in a colander and place them in a baking dish. Squeeze the lemon juice, strain it, and drizzle it over the raspberries 2, add the sugar 3, and mix well.

Cover with plastic wrap 4 and let the raspberries macerate for at least 4 hours in the refrigerator (or better yet, overnight). After this time, retrieve the mixture 5 and transfer it to a pot 6.

Start cooking the jam 7 and skim it as soon as necessary with a skimmer 8. The jam typically needs to cook for about 50-60 minutes over medium heat, stirring occasionally. The jam is ready if, when you drop a bit on a saucer and tilt it, it remains stable and doesn't run. If you prefer to remove the raspberry seeds, pass the jam through a sieve or food mill. Then proceed to pour the still-hot raspberry jam into the sanitized jars 9, being careful to leave 0.4 inches from the jar's edge. Lightly tap the containers on a surface to settle the plum and ginger jam. Close the jars and let them cool. If you use jars with rubber seal closures, you can test the vacuum by pulling the tab: if pulling it produces a sharp noise, it means the content has been properly vacuum-sealed. On the contrary, if pulling the tab the seal feels "soft," it means the vacuum wasn't created correctly, and it's better not to consume the content. If you use jars with screw caps, after inserting the hot jam, screw the lids on well, but not too tightly, and let the jars cool. You can turn them upside down or skip this step: the heat will create a vacuum anyway, which will allow the product to preserve for a long time. Once the jars have cooled, check if the vacuum has formed correctly: you can press the center of the cap, and if you don't hear the classic "click-clack," the vacuum has occurred. Once you have verified that the storage was successful, your raspberry jam is ready to be stored in the pantry!