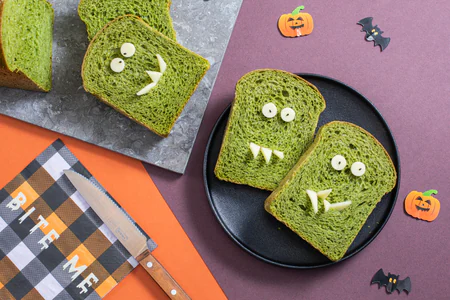
Monstrous Sandwiches
Monstrous sandwiches are spooky treats, perfect for Halloween parties. Discover the recipe to make them, the kids will love them!
- Average
- 45 min
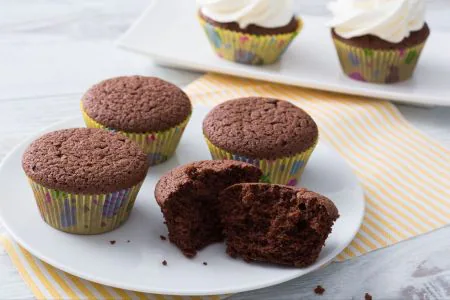
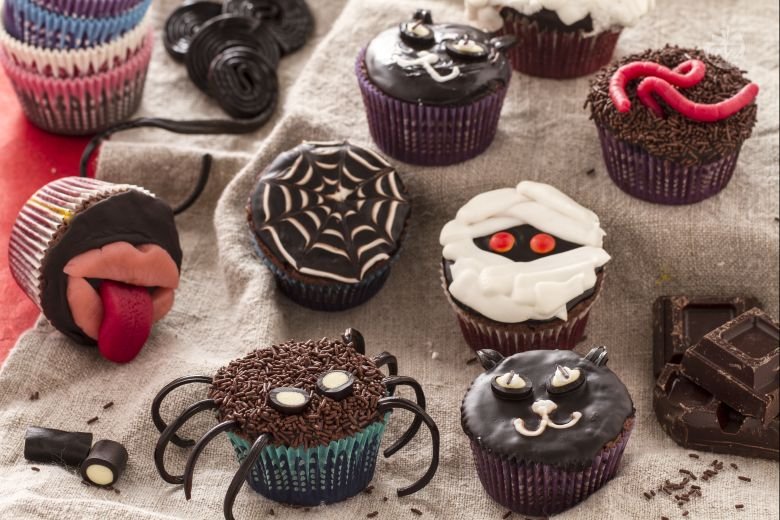
Looking to add some excitement to your Halloween? These Halloween monster cupcakes are really what you need! They take the classic chocolate cupcake and transform it into a festive treat that’s both spooky and fun. Start with a simple chocolate base—pretty simple, really—that you can whip up a day ahead. Just store them in the fridge, and they'll stay moist and delicious for a couple of days. Decorating becomes the main event. Kids will love getting creative with colored sugar paste, sprinkles and candy eyes to craft their own monster faces or creepy creatures. Why stop at one design? Mix things up with spooky mummies, silly zombies, or bright green goblins. Before you know it, you'll have a table full of monster cupcakes recipe ideas that look as cool as they taste.
Bright colors and weird shapes really really make these Halloween cupcakes pop at any party or classroom treat table. Consider setting up a decorating station so everyone can add their personal touch using goodies like colored glaze, fondant horns, and gummy worms. And here's the thing—this decorating style is super forgiving. You actually want them to look a bit wonky and wacky. The more unique and funny each cupcake looks, the better! These easy Halloween cupcakes are perfect for anyone seeking a hands-on activity with kids or just a break from ordinary desserts. With all the creative options, they quickly become the highlight of the sweets table. Even after the party wraps up, these spooky cupcakes keep well in the fridge, so you can enjoy a monster or two the next day. When you're in need of fresh Halloween baking ideas that bring smiles and laughs, these monster-themed treats always do the trick. Get creative, play with the colors, and just have fun—these cupcakes aren't about being perfect, just about making things a little more playful and a lot more memorable. Which is great.
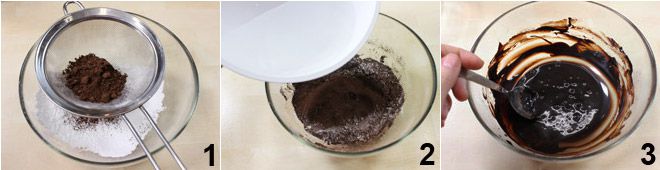
To prepare the monstrous Halloween cupcakes, first start with making the Chocolate cupcake. First, make the cocoa glaze by sifting cocoa and powdered sugar into a bowl 1. Heat the water and gradually add it to the powders 2, stirring with a spatula until it reaches a smooth and homogeneous consistency 3. Unroll a licorice wheel, cut 4 strips of 1-1.5 inches and open them in two, obtaining 8.
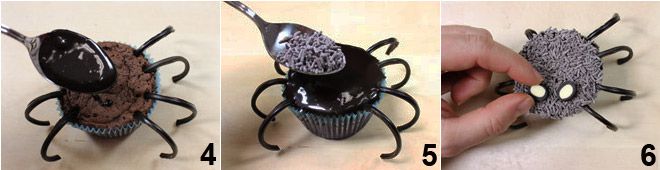
At this point, take a cupcake and use a toothpick to make 4 holes on one side and another 4 on the other side: insert the licorice strips into the holes and cover the top of the cupcake with a spoonful of cocoa glaze 4. Sprinkle a spoonful of chocolate sprinkles over the top 5 and finally decorate with two filled licorice candies, placed close together like eyes 6 to create your spooky spider-shaped cupcake!
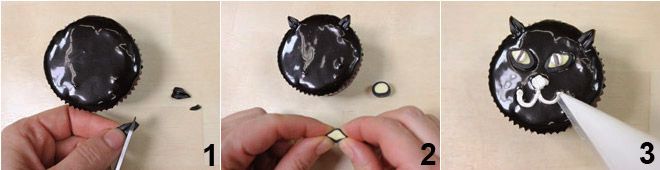
Take a chocolate cupcake and cover the surface with cocoa glaze. Prepare the royal icing following the instructions found here and transfer it into a piping bag. Cut small rectangles of licorice, trim the corners on one side 1 and insert them into the side of the cupcake, like two ears. Then shape two filled licorice candies, flattening the sides 2 and place them just below the licorice ears. With the cocoa glaze, make a stripe in the center for the pupils. Finally, use the royal icing to form the cat's nose and whiskers 3: your spooky cat-shaped cupcake is ready!
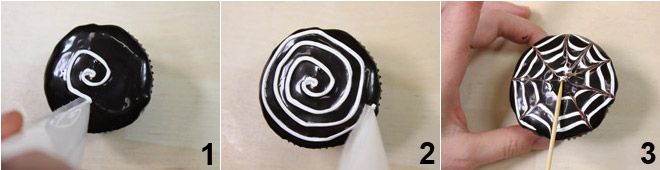
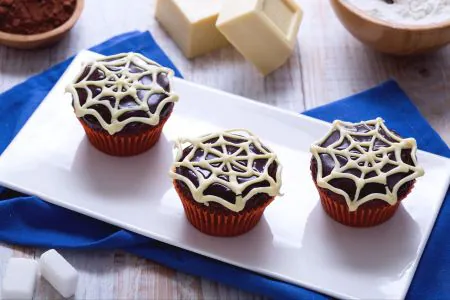
Take a cupcake and cover the surface with cocoa glaze. Use royal icing to create a spiral from the center to the outer edge (1-2). Now with a toothpick or wooden skewer, drag lines from the inside outwards to create the spider web effect 3.
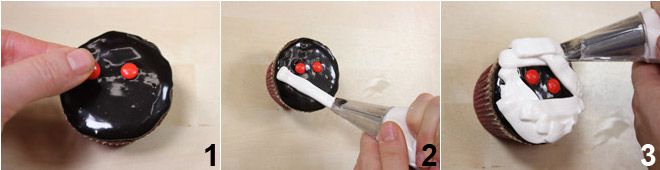
Take a chocolate cupcake and cover the surface with cocoa glaze. Place two round, red candies in the center of the first half of the cupcake 1. Attach a stripe nozzle to the piping bag and use royal icing to create strips covering the entire cupcake, like bandages, leaving only the eyes visible (2-3). Your spooky mummy-shaped cupcake is ready!
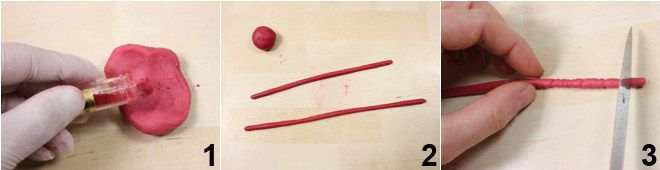
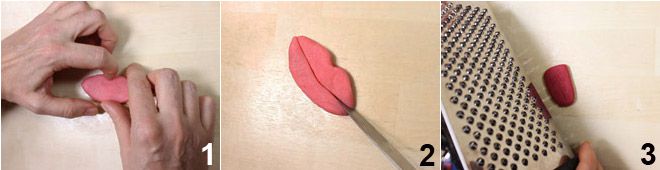
Color the fondant with pink/red powdered dye (note: always use disposable gloves) 1, kneading it with your hands. Roll it into sticks 2, and with a knife, make small marks on the surface 3. Finally, cut them into lengths of approximately 2-2.5 inches: here are your worms.
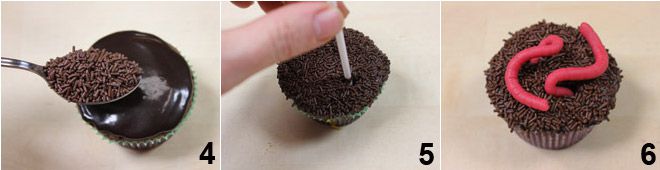
Now take a cupcake and cover the top with a spoonful of cocoa glaze and a sprinkle of chocolate sprinkles 4. Use a wooden skewer to make two holes in the center of the cupcake 5 and insert two worms, twisting them around each other as if they are moving 6: your spooky worm cupcake is ready!
Mold a piece of leftover fondant into a flat oval, then press it in the center 1 and stretch it at the sides 1, like a mouth 1. Cut it in half 2 and set aside. Take another piece of fondant, darken it with more dye, and shape it like a tongue: to make it more realistic, score the center with a knife and press it against a grater to recreate the porous surface of a real tongue 3.
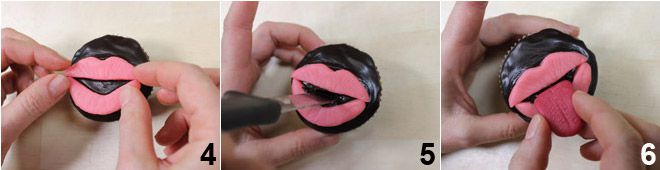
Take a cupcake and cover it with cocoa glaze; place the mouth on top 4, carve out the center of the mouth with a knife 5, and insert the tongue into this hole 6. Your spooky rock cupcake is ready!