Fruit Puff Pastry Tart
Discover how to make a delicious fruit puff pastry tart with pastry cream and fresh fruit, a simple, colorful dessert perfect for any special…
- Easy
- 40 min
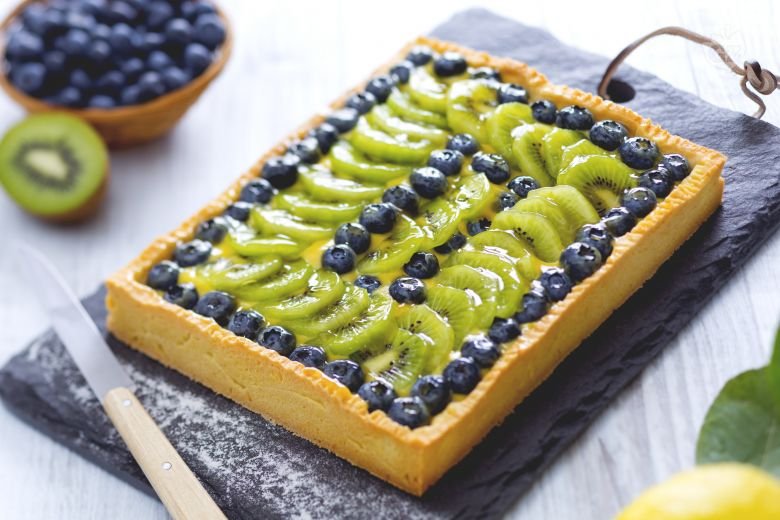
In Central Italy, the kiwi blueberry tart is this wonderful twist on the classic crostata—really, a mix of tradition and creativity. Locals, they really love how a fruit tart recipe changes with the seasons. And this crostata di kiwi e mirtilli? It's a prime example. It starts with a tender shortcrust pastry, called frolla, that fills the air with vanilla and lemon while baking. Such a fresh citrus kick makes the kiwi blueberry tart stand out. Italian bakers? They go for the freshest market fruits, and the sweet-tart kiwi paired with juicy blueberries is super, super delicious—bright, colorful, and fancy but not overdone.
Beneath all that fruit, there's a creamy layer that just melts in your mouth. And the berries? They add this tangy sweetness. And perfect for birthdays, family lunches, or just a Sunday snack. You know, nothing beats a slice of this easy fruit tart. Italians, they’re into presentation, often lining up the fruit in neat rows or swirling patterns. So, it looks like a real showpiece.
The crostata can change, too—sometimes kumquats, sometimes rhubarb, depending on the season's best. What makes this kiwi blueberry tart so beloved? It's the balance of a crispy crust with that sweet, golden fruit topping. This fresh fruit dessert captures what Central Italian baking is all about: tradition mixed with new ideas, focusing on taste and looks. Whether a quick treat after dinner or a meal's centerpiece, this tart shows how Italian desserts keep things exciting. So, no matter how you slice it, this tart is proof of Italy's baking heritage—blending old with new, always keeping flavor and appearance in mind. Pretty much.
You might also like:

To make the shortcrust pastry, start with the ``sabbiare'' (sanding) method: in a food processor place the sifted flour, a pinch of salt and the butter just taken from the fridge (so very cold), cut into pieces 1. Pulse until you obtain a sandy, floury mixture 2; pour the resulting mixture onto a cold work surface (or into a bowl that has preferably been chilled) and add the sifted powdered sugar. Pour the grated lemon zest into the center as well 3 (alternatively you can flavor with untreated orange zest, the seeds of a vanilla pod or some cinnamon), then form the classic fountain shape by creating a well in the center.
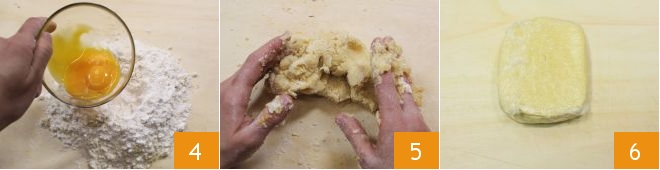
Then add the yolks 4 and begin to combine everything first with a fork; when the eggs have been absorbed you can continue by hand. Knead briefly and quickly 5, just long enough to bring the dough together so that the shortcrust does not warm too much from the heat of the hands and remains crumbly. Form a disc and flatten it slightly before wrapping it in plastic wrap 6; place it in the refrigerator to firm up for at least 30 minutes.
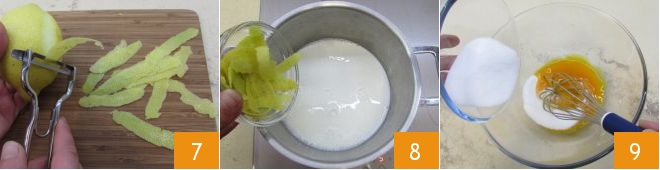
Meanwhile prepare the lemon cream. Wash and dry the lemons, then remove the zest taking care not to include the white pith 7 and place it in a saucepan to which you have added the milk 8. Turn the heat to low and warm the milk (it should not reach boiling). In the meantime, in a bowl put the yolks, the sugar 9 and whisk the mixture.
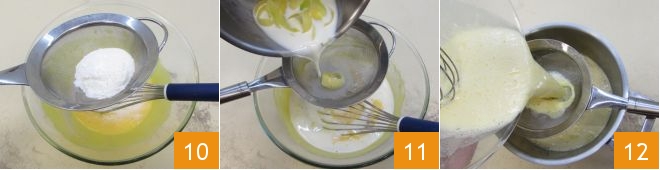
You should obtain a homogeneous cream, then add the sifted flour and potato starch 10; whisk to combine the dry ingredients; at this point add the warmed milk filtered through a sieve 11 to hold back the zest. Stir vigorously to obtain a smooth, fluid mixture, then pour it back into the saucepan, straining it through a fine-mesh sieve to prevent lumps 12.
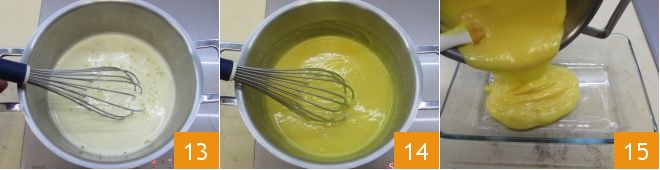
Turn the heat to low and cook the cream, stirring constantly with a whisk 13, until it has thickened (this will take about 20 minutes). When it has thickened 14 turn off the heat; transfer the cream to a wide shallow dish 15.
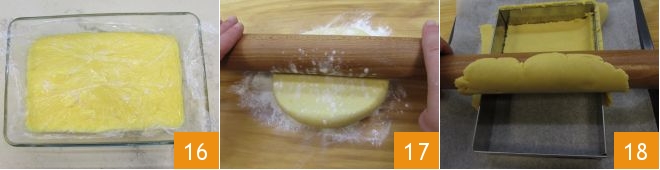
Then cover it with plastic wrap directly on the surface 16 and let it cool to room temperature; then transfer to the refrigerator to chill completely. At this point take the shortcrust pastry back, roll it out on a lightly floured work surface 17: you should obtain a sheet about 3/8 inch thick. Wrap it around the rolling pin and unroll it over a 9 7/16 x 6 11/16 in pan 18 (we used a baking sheet lined with parchment paper on which we placed a removable-bottom rectangular pan of the indicated size). This way you will easily remove the excess pastry.
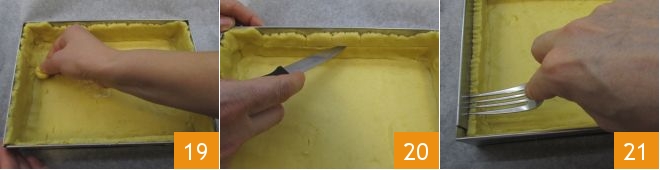
With a bit of leftover pastry, form a small ball to use to press the bottom and the edges so the pastry adheres well to the pan 19. Trim the excess edge with a knife to give a regular thickness 20. Mark the edge with the tines of a fork to create a decorative pattern 21.
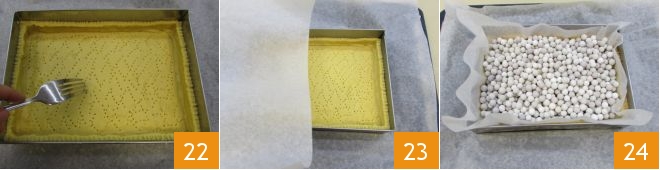
Then, using the fork, prick the bottom all over 22 and proceed with blind baking as follows: line the pastry with a sheet of parchment paper 23 and place ceramic baking beads inside 34 (alternatively use dried beans or chickpeas). Bake in a preheated conventional oven for 30 minutes at 356°F.
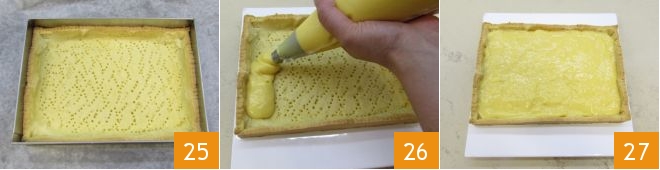
Once baked 25, let the base cool, then take the cream which will have become well chilled and firm, pipe it into a pastry bag and fill the tart base 26 so as to cover it completely 27.
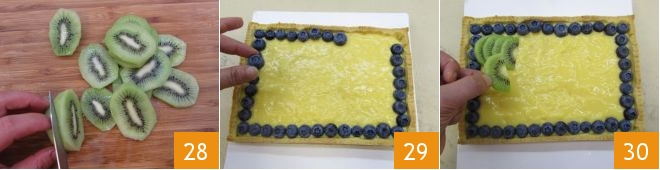
Then move on to decorating: peel and slice the kiwis 28 and cut the slices in half; wash and dry the blueberries and begin to arrange them on the tart following the edge 29. Place the kiwi slices alongside the blueberries in a row 30.
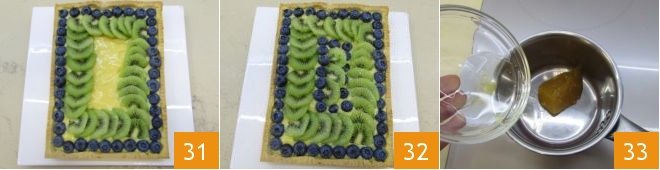
Then arrange the blueberries in the center and more kiwi slices (31-32). You can garnish following any geometric pattern you like. At this point put the orange marmalade in a small saucepan and loosen it with the water 33 over low heat;
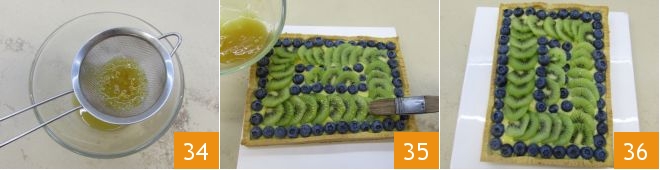
then strain it through a sieve to obtain a liquid mixture 34 to spread on the surface of the tart to make it glossy, using a pastry brush 35. The kiwi and blueberry tart is ready to be enjoyed 36!