
Cassata Tile
The cassata tile is a delicious and scenic dessert inspired by the typical Sicilian Easter cake. Discover how to prepare this recipe at home!
- Difficult
- 1 h 35 min
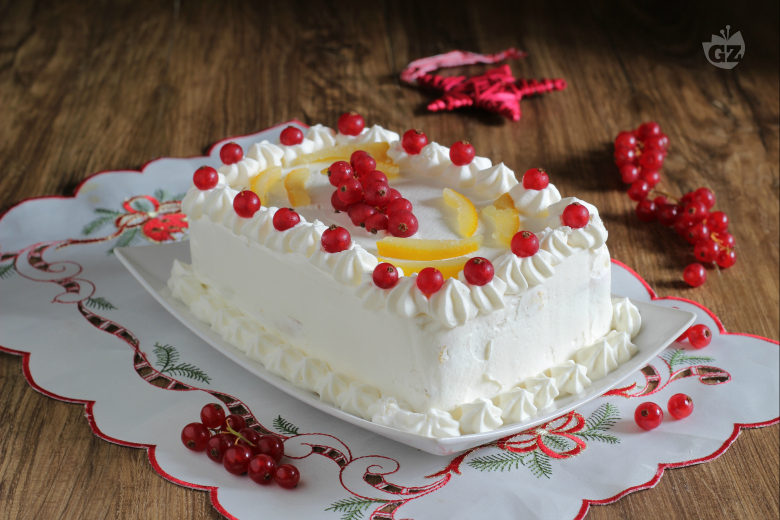
Christmas chocolate squares, or as they're called in Italy, la mattonella di Natale, are those holiday chocolate bars that just make December feel extra special. And listen, this no-bake treat is perfect for anyone wanting a fun, moist dessert without, you know, spending hours in the kitchen. Really good stuff. Layers of savoiardi (classic Italian ladyfingers), plenty of whipped cream, bright orange peel, and bursts of red currants all come together in a simple loaf pan. Also, bits of white chocolate chips sneak into every bite, offering a surprise crunch that goes so well with the soft, tender layers. Seriously good. In some regions of Italy, folks swap in yogurt or different berries—pretty much whatever you like or have around.
The best part? This dessert turns out super colorful and feels just right for the Christmas table—almost like a slice of the holidays you can eat. Friends and family usually can’t believe how something so easy turns into such a festive chocolate treat. One of the things that makes these Christmas chocolate squares stand out is their mix of texture: you get the crispy edge from the savoiardi, but everything stays nice and moist from the whipped cream. And here's the thing, the hint of candied orange peel adds a little kick that keeps things interesting, cutting through the richness of the chocolate.
Italian families love pulling this recipe out year after year—no question about it—especially because it fits right in with other easy Christmas desserts—no fancy skills needed, just some time to chill in the fridge. Whether you stick to the original version or try one of those modern takes with yogurt and berries, these no-bake chocolate squares have a way of making everyone at the table smile. For those who want something different from the usual cookies or cakes, this is a really great pick from the world of Italian Christmas baking recipes—just simple, golden layers that come together for a dessert you’ll want to make again next season.
With these flavors, your holiday will be a little sweeter and even more memorable.
You might also like:

To make the Christmas tile, first line a 12-inch loaf pan with plastic food wrap 1. Pour the cream into a bowl, add the powdered sugar 2, and whip with an electric mixer until firm and stiff 3. Divide the whipped cream into 2 equal parts: use one part immediately for the filling, while keeping the other part in the refrigerator for decoration.

Take the mold and place 6 ladyfingers on the base 4, then brush the ladyfingers with the strained orange juice 5 and cover with whipped cream 6.

Place some candied oranges on the cream 7 and add half of the white chocolate chips 8, then form another layer of ladyfingers 9 and moisten them with orange juice.

Continue in the same way by adding whipped cream, candied peel, and the remaining white chocolate chips 10. Finish with a final layer of ladyfingers and brush them with orange juice 11, then cover the mold with plastic wrap 12 and refrigerate to set for about an hour.

Once the cooling time has elapsed, turn the mold over onto a serving plate and remove the plastic wrap. Cover the surface of the tile with whipped cream using a knife or spatula 13. Transfer the remaining whipped cream into a piping bag with a star nozzle and squeeze some tufts on both the edges and the sides 14. Finally, decorate with the red currants and some candied orange peel: your Christmas tile is ready to be served 15!